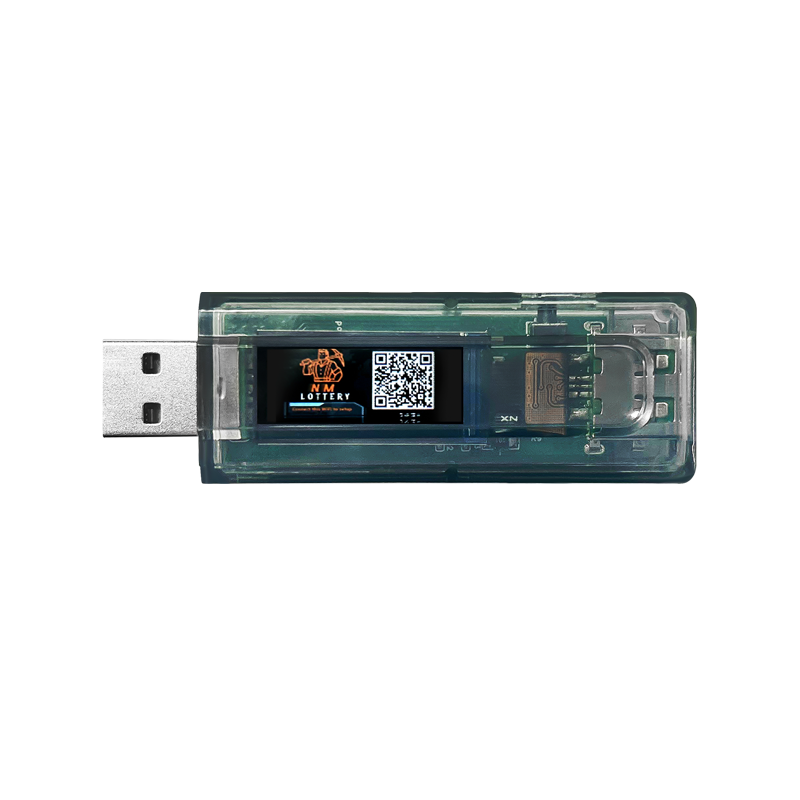
The NM-RF-HAT is designed as a companion hat for ESP32-2432S028 CYD device. Support Bruce firmware, and other RF application with ESP32.
1 Specification
1.1 General Specification
| Tile | Info |
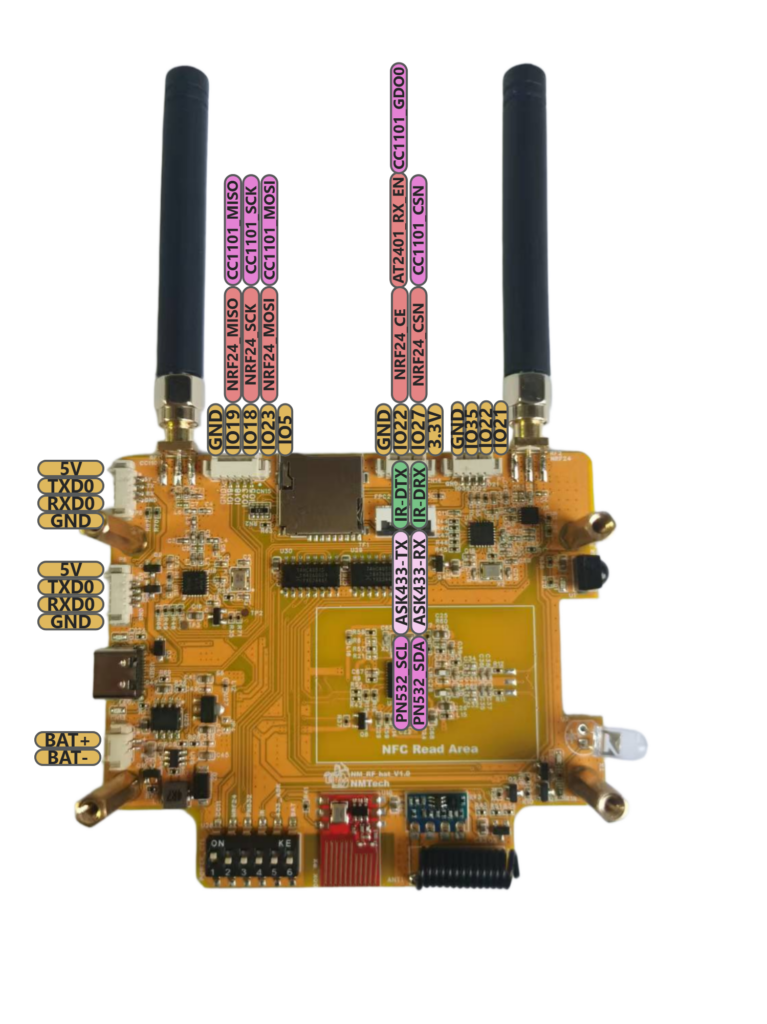
| Modules | CC1101 / nRF24L01 / PN5321 / RF433-ASK / IR TX and RX |
| Supply mode | USB 5V DC / Battery 3.7V |
| Supply Interface | Type-C USB(5V DC) /MX1.25 connector(Battery ) |
| Function switch | DIP switch |
| Battery voltage range | 2.5V~4.2V |
| Battery charge current | 500mA |
| CC1101 433M RF Connector | External thread internal pin SMA |
| NRF24 2.4G RF Connector | External thread internal hole SMA |
| Power Consumption | 1~1.9W(Assembled with CYD) |
| Operatiing Temperature | -20 ~ 70 ℃ |
1.2 Function diagram and description

| Module | Frequency / Type | Function | Key Benefit |
| CC1101 | 433MHz FSK/GFSK | Remote Control | Comprehensive Sub-GHz analysis and replay. |
| NRF24 | 2.4GHz | Wireless Protocol Analysis | Targeting common 2.4G peripherals (mice, keyboards). |
| PN5321 | NFC/RFID | Read, Write, Emulation | High-frequency RFID access and cloning capabilities. |
| IR Control | IR TX/RX | Infrared Signal Capture/Replay | Universal remote control and analysis. |
| RF433 | 433MHz OOK/ASK | Basic RF Transmission | Simple 433MHz OOK signal handling. |
| Power Management | USB-C, BAT Circuit | Charging, On/Off Switch | Stable, portable power for field use. |
| GPS Expansion | GPS Header | GPS/Location Tracking | Used for Wardriving and GPS tracking. |
1.3 Pin Map
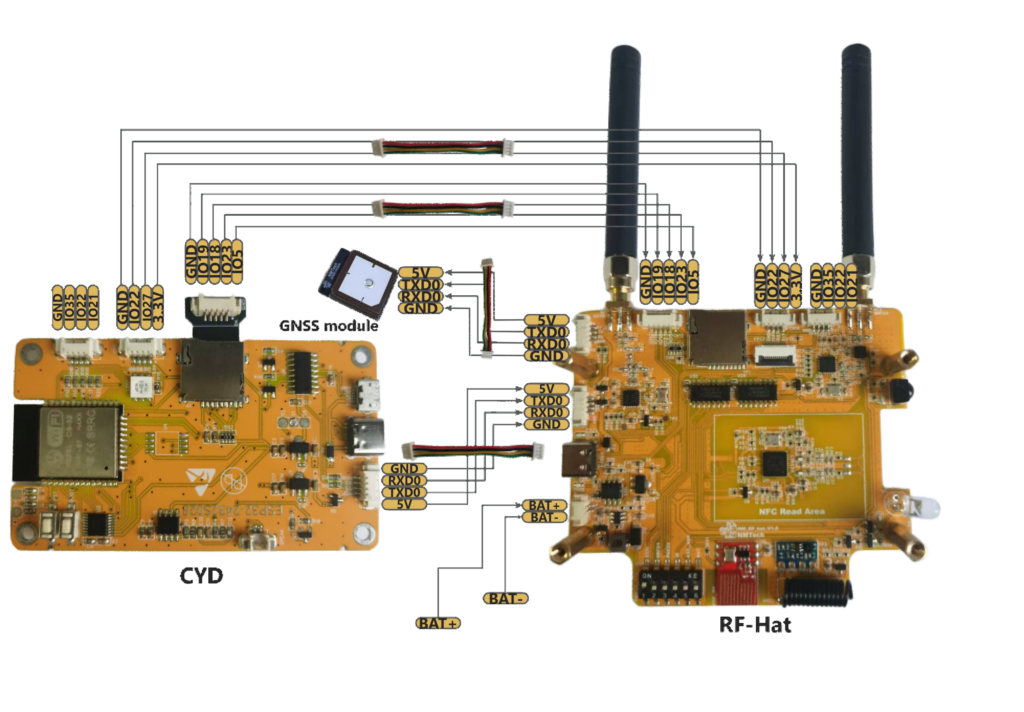
1.4 Connection with CYD
2 Getting Start and configuration with Bruce
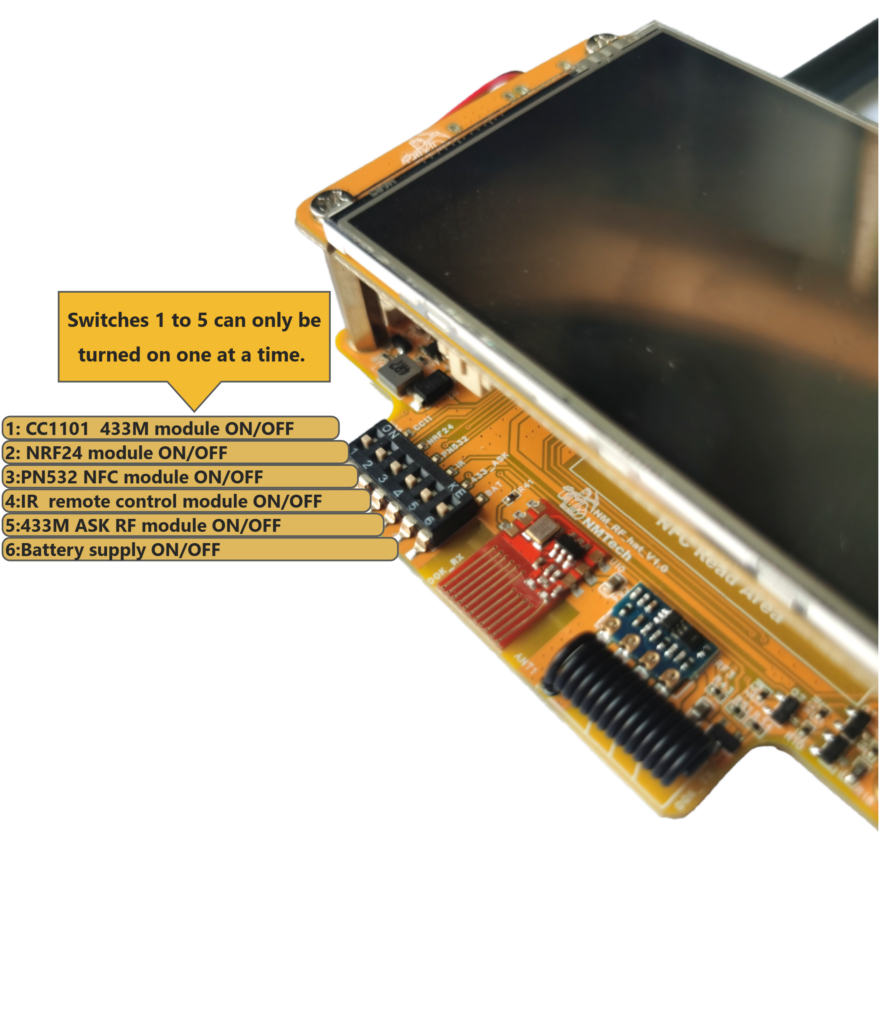
2.1 Module Switch
The NM-RF-HAT uses a 6-position DIP switch for function switching. The sixth position is the battery power switch, while position 1 to 5 are function switches. Only one function switch can be set to the ON, and only one function can be active at any given time.
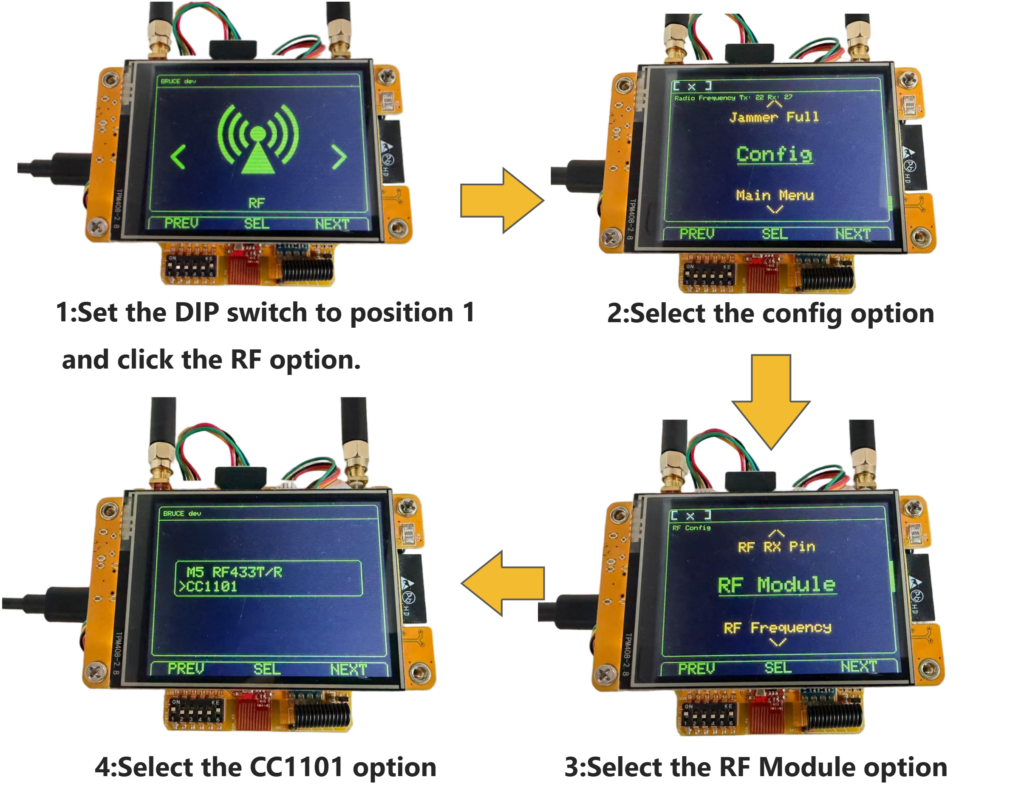
2.2 CC1101 ( 433M )
When you start using the CC1101 function, you will follow the steps below.
- Set the DIP switch to position 1 and select the RF option.
- Choose the Config option.
- Select the RF Module option.
- Pick the CC1101 option.
- Then return to RF menu to use other CC1101 functions.
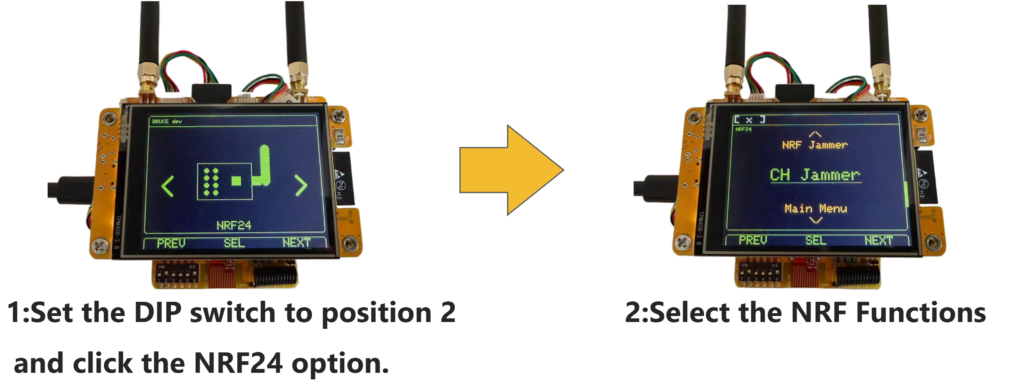
2.3 NRF24
- Set the DIP switch to position 2 and select the NRF24 option.
- Select the NRF functions (such as Spectrum, NRF Jammer, or CH Jammer) as needed.
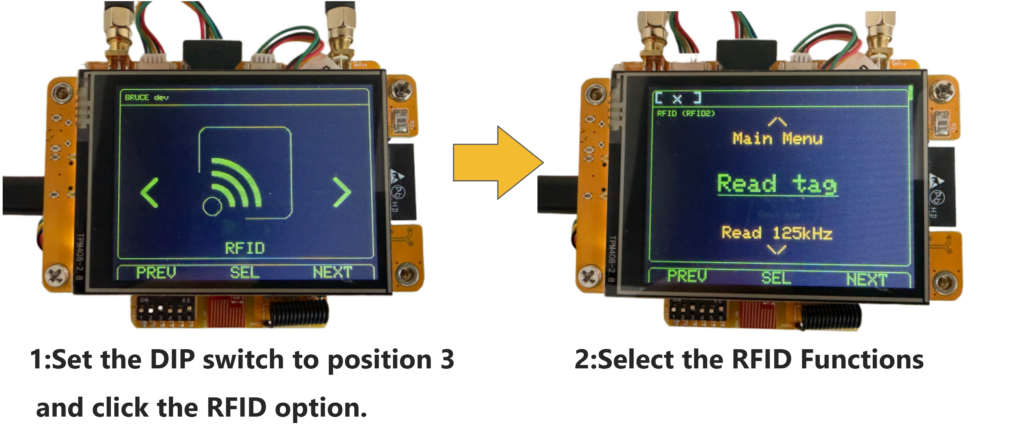
2.4 PN532 NFC
When you start using the RFID/NFC function, you will follow the steps below.
- Set the DIP switch to position 3 and select the RFID option (Config -> RFID module -> choose PN532 on I2C).
- Select the RFID functions (such as Read tag ) as needed.
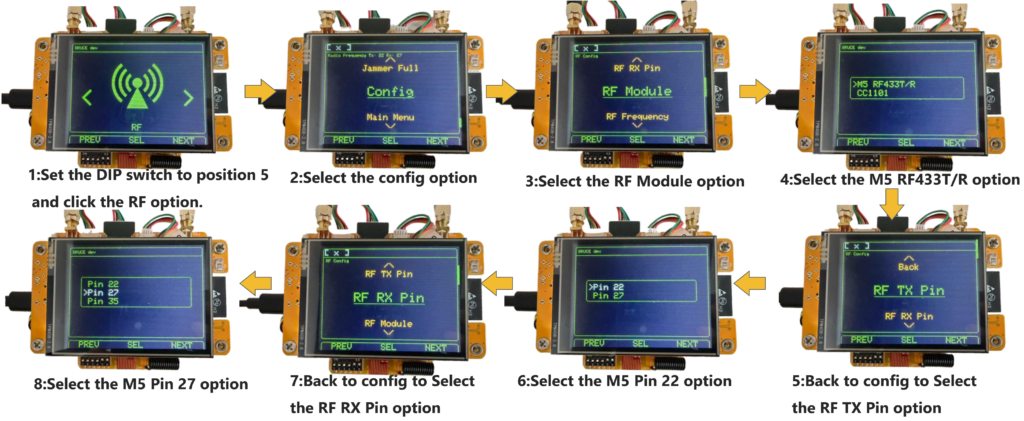
2.5 RF 433M – OOK/ASK
When you start using the RF 433M -OOK/ASK function, you will follow the steps below.
- Set the DIP switch to position 5 and click the RF option.
- Select the Config option.
- Select the RF Module option.
- Select the M5 RF433T/R option.
- Return to the config menu and select the RF TX Pin option.
- Select the M5 Pin 22 option.
- Return to the config menu and select the RF RX Pin option.
- Select the M5 Pin 27 option.
- Then return to RF menu to use other RF433 functions.
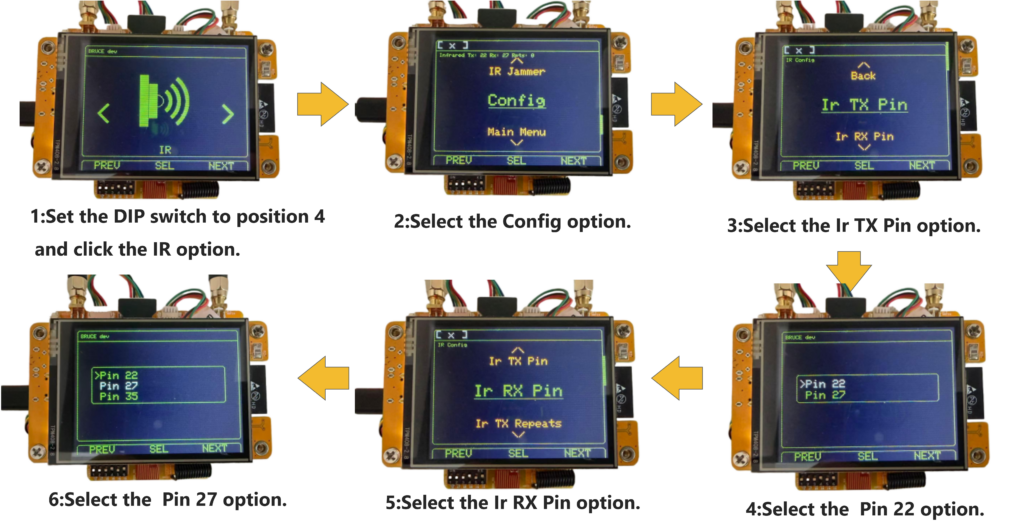
2.6 IR Controller
When you start using the IR controller function, you will follow the steps below.
- Set the DIP switch to position 4 and select the IR option.
- Select the Config option.
- Select the IR TX Pin option.
- Select the Pin 22 option.
- Return to the config menu and select the Ir RX Pin option.
- Select the Pin 27 option
- Then return to IR menu to use other IR functions.
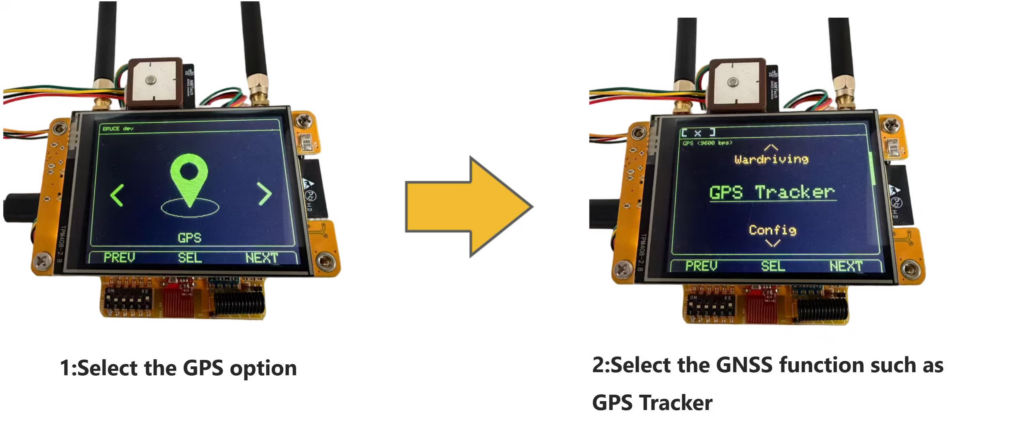
2.7 GPS
When using the GPS function, you need to connect the GPS module first, and then follow the steps below to operate.
- Select the GPS option ( the official firmware changed default pins to RX=22 TX=27, for nm-rf-hat change to RX=1 TX=3)
- Select the GPS function such as GPS Tracker/Wardriving
3 Contact NMTech
Bruce Wiki: https://wiki.bruce.computer/
Home page: https://www.nmminer.com
Telegram: https://t.me/NMMiner
Reddit: https://www.reddit.com/r/NMTech_Team/
Email: nmminer1024@gmail.com
AliExpress (NMTech Global Store): https://www.aliexpress.com/item/1005011692167789.html